HOT
 Xsens’ new MTi 600-series wins AUVSI XCELLENCE …
 The Future Group, Xsens and IKINEMA partner up
 Live data analysis of the long jump at the FBK G…
 Xsens and Ergoneers join forces to launch ergono…
 New MTi 600-series industrial-grade inertial sen…
 Xsens North America Celebrates New Office Grand …
 Xsens’ latest update takes outdoor motion captu…
Automated Smart Inspection Station with Geomagic Control Signals a New Era in Metrology for Fast Part Inspection
Imagine if you could increase your productivity by automating the process of scanning parts, analyzing them for accuracy, and creating detailed reports of the findings. Well, Level 3 Inspection has turned this dream into a fully-functional reality. The company, with locations in Florida and Indiana, has long been known for its metrology and dimensional inspection services for precision manufacturers.
Imagine if you could increase your productivity by automating the process of scanning parts, analyzing them for accuracy, and creating detailed reports of the findings. Well, Level 3 Inspection has turned this dream into a fully-functional reality. The company, with locations in Florida and Indiana, has long been known for its metrology and dimensional inspection services for precision manufacturers.

Level 3 Inspection has now created the Smart Inspection Station - a robotically controlled, integrated optical scanning and computer-aided inspection (CAI) system. This system automatically makes precise 3D scans of parts, analyzes the parts against CAD and BluePrints, determines the part disposition, and creates comprehensive inspection reports. Using the Smart Inspection Station, you can greatly increase your part inspection efficiency and accuracy (throughput).
This patent-pending device uses white light scanning (WLS) technology, or any other optical scanner, in tandem with a parts positioner and Geomagic Control (formerly known as Geomagic Qualify). Working together, this system provides automation controls that allow for repeated, accurate scanning which can be performed in mere minutes. By using Geomagic Control, an industry-leading 3D inspection software tool, the Smart Inspection Station delivers NIST- and PTB-certified accuracy in dimensional measuring, annotations, comparisons, and results reporting. By harnessing the power of Geomagic Control's Python scripting capability, the system can be easiliy customized with automated processes for sustainable repeatability and consistency.
“This is a very versatile system with incredibly fast and quite exact results,” commented Bill Greene, co-founder and CEO, Level 3 Inspection. “With very high degrees of accuracy from the white light scanning system, coupled with precision measurement and comparison from Geomagic Control, manufacturers are able to inspect, disposition and create reports on parts in just a few minutes.”
The highly configurable SiS offers scanner resolutions of 4, 5, and 11 (or even higher) megapixels, and measuring volumes of 50 to 380 mm or bigger in different configurations to generate the very high scan data density needed for particular parts being inspected. It currently has a three-axis parts presenter available for part manipulation in front of the scanner, although other configurations are already engineered.
Why White Light Scanning?
Inspection of parts has traditionally been performed with CMMs in the manufacturing cell where a few hundred points are typically gathered and reported in a table of coordinate number to be assessed for part geometry conformance. This technology is over forty years old and simply doesn’t provide enough information to support process optimization decisions adequately. The 21st century optical metrology tools are more accurate and much more comprehensive, plus provide better visualization of the part geometry for greater understanding and confidence in the results. And now these technologies are also quite fast.
One of the first questions that arises in considering modern measurement and inspection technologies is correlation to the legacy inspection methods. This correlation has never failed for Level 3 Inspection and its clientele. In one example, 200 CMM points were gathered to measure a shoulder dome implant, which was passed as dimensionally acceptable. A 3D white light scan of that same part collected 200,000 scan data points which, once analyzed in the best-fit sphere blueprint requirement, caused the part to be found out of tolerance. In the ensuing correlation investigation it was found that the CMM points overlayed on the WLS points had perfect correlation, the identical number to 5 or 6 decimal places, however the CMM data points had overlooked a ring-shaped anomaly in the part that was picked up in the white light scan data and caused the different conclusion in the inspection reports. The client Metrology team on-site stated that White light scanning with Computer-aided inspection was “clearly superior to CMM” and the client adjusted the way they dimension their blueprints to take advantage of modern 3D inspection capabilities.
White light scanning is very fast, collecting millions of required data points in minutes but also with unprecedented levels of accuracy and precision. The white light scanner used in the SiS can digitize parts to accuracies of between 1.0 micron down to 0.1 micron depending on configuration.
Calibration of the SiS is also fast and user-friendly with a library of setup files included and a simple ‘watch-and-repeat’ process for developing part-specific routines

Computer-Aided Inspection with Geomagic Control
Geomagic Controldelivers the accuracy, measurement and comparison tools plus reporting tools in a flexible, customizable environment that perfectly complements Level 3 Inspections’ SiS. The part scan data is immediately visible in Geomagic Control from which instant standard and pre-programmed reports can be created. Outputs can be as simple as ‘Go/No Go’ capabilities to comprehensive inspection reports with GD&T callouts and 3D color maps.

Reports can be generated in 3D PDF, html, Office and other standard output formats, including .xml for direct integration into Statistical Process Control systems, to enable immediate widespread communication of the information. This also allows engineers and manufacturing staff to quickly see problems, trends and surprises that might be visible in the inspection reports but not to the naked eye.
Geomagic Control also delivers the flexibility of open source Python scripting. The Geomagic Python Scripting Environment provides the link between your data and hardware to our industry leading 3D data processing technology. Scan data capture, sampling, noise reduction, alignment and registration, topological analysis, GD&T, CAD comparison, and report generation can all be customized and orchestrated. Together with your programs, hardware, and the endless list of professional and academic open source Python modules, Geomagic Control truly provides customization and automation at unprecedented levels of flexibility.

“With this combined system, manufacturers are given instant yet meaningful insights into the capabilities and limits of their processes,” said Greene. “Process optimization that used to take weeks or months can now be achieved in days, and with far fewer iterations.”
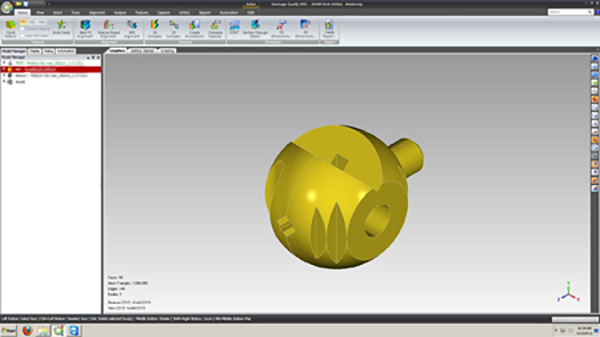
(Images left: Top. The scanned product in Geomagic Control.
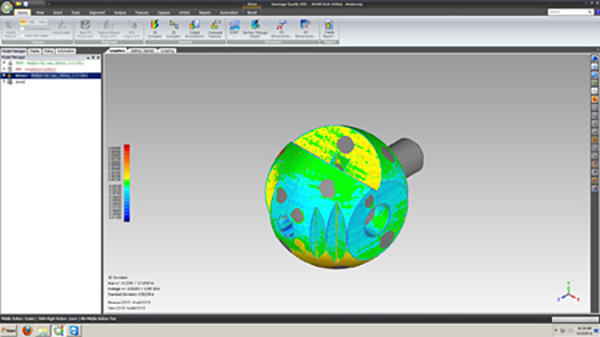
Middle: Color map display of deviations and variations compared to the original CAD data
Bottom: Annotated model with measurements. All these images are collected automatically into a report for use across the operation.)

The new era in inspection
Level 3 Inspection has been working in these technologies for 11 years and has helped the industry grow while these tools have become more available, affordable and far more powerful. Now that these tools are integrated into an automated integrated shop floor system, they are also much faster to meet production inspection requirements.
“The SiS is the first breed of what our customers have been asking for to empower their production lines and deliver a faster, more closed loop of feedback for process control and management,” said Bill Greene. “The flexibility of Geomagic Qualify in its automation tools and scripting is a key part to making these processes immediate without requiring software expertise from those on the shop floor.”


