SPEED UP SETUP TIME OF VANTAGE, VERO, VUE, T-SERIES AND BONITA
Contact us:
TEL: +086-010-50951355 / FAX:+86-010-50951352
Email : cathy@souvr.com / Frank@souvr.com / Robin@souvr.com / sales@souvr.com
Details
Related
Consulting
※Product Overview※
SPEED UP SETUP TIME OF VANTAGE, VERO, VUE, T-SERIES AND BONITA
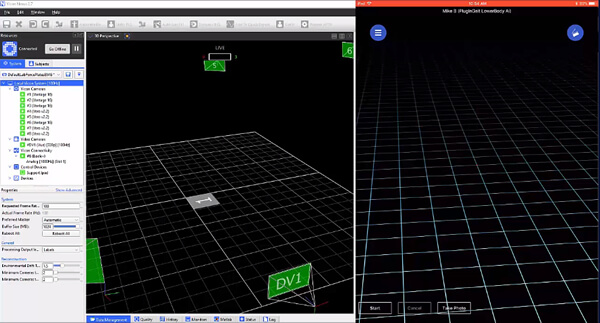
Free yourself from the capture PC. Vicon Control is our first tablet and phone application designed to make setting up your Vantage, Vero, T-Series and Bonita system easier than ever. Control connects wirelessly to Vicon’s Tracker, Shōgun, and Nexus software. It streams camera data wirelessly to your mobile or tablet device, allowing a single operator to make adjustments on the fly.
Control 1.3 is a patch release for Vicon Control that adds a series exciting of new functions expanding what you can do with your phone or tablet when connect to your Vicon system. Please note that features 1-4 are available on all platforms. Features 5-10 are available when connected to Vicon Nexus.
VICON CONTROL
NEW FEATURES
Stream video from Vicon Bonita and Vue cameras
AutoNumber your cameras
Enable/Disable a cameras’ ‘Tap to Select’ function
Add the ability to update video camera parameters including:
• Video calibration mode
• Shutter duration
• Threshold
Subjects:
• Add and select subjects
• Display the currently active subject
• Edit subject information – add subject measurement
Take a trial photo with your device
Take a trial video with your device
Create and Add ‘Trial Tags’
Set trial type
Display Post-capture pipeline feedback

TECHNICAL INFORMATION
Compatibility
Vicon Control is free to download and works beautifully with Vicon Vantage, Vero, Vero X, Vertex, Bonita and T-Series. Requires Tracker 3.1, Shōgun 1.0, Blade 3.2 or Nexus 2.2 and a compatible iOS or Android device.
We support the current iOS version, and the current and previous android OS.
| Current release version | Windows 10 | Windows 7 | Linux | OSX |
| Shōgun 1.2.1 | 64 bit | 64 bit* | x | x |
| Nexus 2.8.1 | 64 bit | 64 bit* | x | x |
| Tracker 3.7.0 | 64 bit | 64 bit* | x | x |
| Polygon 4.4.2 | 64 bit | 64 bit* | x | x |
| CaraLive 1.3.0 | 64 bit | 64 bit* | x | x |
| CaraPost 1.2.0 | 64 bit | 64 bit* | x | x |
| Pegasus 1.2.1 | 64 bit | 64 bit* | x | x |
| ProCalc 1.2.1 | 64 bit | 64 bit* | x | x |
| ProEclipse 1.2.1 | 64 bit | 64 bit* | x | x |
| DataStream SDK 1.8.0 | 64 bit | 64 bit* | 64 bit | 10.11 |
| Bodybuilder 3.6.4 | 64 bit | 64 bit* | x | x |
Please do note:
1. Recommended and fully supported in Windows 10 (64bit) — with .NET Framework 4.5 and above
2. * Although Vicon Software may install and function under other Microsoft Windows operating systems
(Compatibility tested only Windows 7 (64bit) — with .NET Framework 4.5) , this is not officially supported or recommended by Vicon.
3. For Legacy version please contact Vicon Support
How do I set up my network card?
1. Open the Network and Sharing Center and navigate to Change Adapter Settings. Vicon Vantage/Vero cameras are designated to one port. For each Vue (or Bonita Video) camera connected, there will be additional network port used.
2. Right click on the proper port and go into the Properties. The Local Area Connection Properties window will open. Make sure only Internet Protocol Version 4 (TCP/IPv4) is selected.
3. Select Internet Protocol Version 4 (TCP/IPv4) from the list and select Properties to assign the proper IP address.
a .Vantage/Vero cameras will have the following IP Address: 192.168.10.1 and Subnet Mask of: 255.255.255.0
b. The first VUE camera will have the following IP Address: 192.168.10.2 and Subnet Mask of 255.255.255.0
c. Any additional VUE cameras the last IP value is incrementally increased by one. For example, the second VUE camera will be 192.168.10.3.
Select OK to close out of the Internet Protocol Version 4 (TCP/IPv4) Properties. And OK again to close out of the Local Area Connection Properties. This will make sure all changes have been saved.
4. Feel free to rename the network port so it is easily identifiable. Such as ViconMX, VUE1 or VUE2
For further assistance please refer to the Configuring Ports section of the PCSetupforViconSystems.pdf found in Downloads > Documentation


